Change both labels enable property to True.
Change the 12 labels text properties to the clock 12 hours. Change also the BackColor property to white:
Add another label to the form and name it "time"
Let's add the code for the Form Load event:
Private Sub Form1_Load(ByVal sender As Object, ByVal e As System.EventArgs) Handles Me.LoadThen add the following highlighted declarations to the code:
' adjust the clock numbers positions on the screen:
Label1.Location = New Point(505, 203)
Label2.Location = New Point(561, 261)
Label3.Location = New Point(592, 335)
Label4.Location = New Point(561, 404)
Label5.Location = New Point(505, 464)
Label6.Location = New Point(430, 489)
Label7.Location = New Point(357, 463)
Label8.Location = New Point(305, 408)
Label9.Location = New Point(272, 334)
Label10.Location = New Point(302, 259)
Label11.Location = New Point(354, 200)
Label12.Location = New Point(430, 177)
End Sub
Public Class Form1
' tick will be used to draw 60 marks for each second on the clock
Dim tick As Integer = 270
'tick2 will be used to draw 12 bold marks on each hour on the clock
Dim tick2 As Integer = 270
Then add timer click event code:
Private Sub Timer1_Tick(ByVal sender As System.Object, ByVal e As System.EventArgs) Handles Timer1.Tick
'timer1 will draw the hands of the clock
'convert seconds to angles
Dim seconds As Integer = (Now.Second * 6) + 270
'convert minutes to angles
Dim minutes As Integer = (Now.Minute * 6) + 270
'convert hours to angles
Dim hours As Integer = (Now.Hour * 30) + 270
'text label will hold the current time
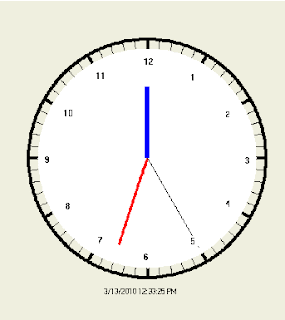
Time.Text = Now
'creating graphics
Dim g As Graphics
g = Me.CreateGraphics
'creating pens
Dim hour As New Pen(Color.Blue)
Dim hour2 As New Pen(Color.White)
Dim second As New Pen(Color.Black)
Dim minute As New Pen(Color.Red)
Dim minute2 As New Pen(Color.White)
Dim white As New Pen(Color.White)
Dim circle As New Pen(Color.Black)
'assigning pens width
hour.Width = 8
hour2.Width = 10
second.Width = 1
minute.Width = 4
minute2.Width = 4
white.Width = 10
circle.Width = 5
'drawing the hands of the clock and their locations
g.DrawPie(hour2, 319, 219, 240, 240, hours - 30, 360)
g.DrawPie(minute2, 289, 189, 300, 300, minutes - 6, 360)
g.DrawPie(Pens.White, 269, 169, 340, 340, seconds - 6, 360)
g.DrawPie(hour, 319, 219, 240, 240, hours, 360)
g.DrawEllipse(white, 319, 219, 240, 240)
g.DrawPie(minute, 289, 189, 300, 300, minutes, 360)
g.DrawEllipse(white, 289, 189, 300, 300)
g.DrawPie(second, 269, 169, 340, 340, seconds, 360)
g.DrawEllipse(white, 269, 169, 340, 340)
'Draw a circle around the clock
g.DrawEllipse(circle, 249, 149, 380, 380)
End Sub
Add Timer2 Tick Event Code:
Private Sub Timer2_Tick(ByVal sender As System.Object, ByVal e As System.EventArgs) Handles Timer2.Tick
' timer2 will draw the shape of the clock and the marks
tick += 6
tick2 += 30
Dim g As Graphics
Dim hoursMarks As New Pen(Color.Black)
hoursMarks.Width = 5
g = Me.CreateGraphics
g.DrawPie(Pens.Black, 249, 149, 380, 380, tick, 360)
g.DrawPie(hoursMarks, 249, 149, 380, 380, tick2, 360)
g.DrawEllipse(Pens.White, 269, 169, 340, 340)
g.FillEllipse(Brushes.White, 269, 169, 340, 340)
If tick > 800 Then
'drawing the shape is done and the timer will stop
Timer2.Stop()
tick = 270
tick2 = 270
End If
End Sub
Note: Change the form WindowState property to Maximum to better see the clock working.
Sumber :


0 Response to "Analog Clock Tutorial - Visual Basic.NET"
Posting Komentar